Blog Archive

Thursday, November 9, 2017

Husker Gear!!

I got the opportunity (FINALLY!) to go to my very first Husker game last weekend. I knew for certain that I needed some custom me made Husker gear for this joyous occasion. 

After many weeks of planning and sewing I was very excited to wear my creations!


It is Fall, and it is freezing out. I needed a hoodie. I did not have the time to sew my own hoodie, so I purchased a plain black hoodie and went to work with my Cricut to make it mine.

The Husker emblem was a file I already had, but I needed a great saying to go on the front. Thread and Grain to the rescue! I HAD to have this 'Here for the Huddle' vinyl on my hoodie!


Please forgive my horrible hair... I didn't even look in the mirror before I left the house. Holy bad hair day!


For about 20 minutes it was warm enough to take my hoodie off, and show off my me made Husker Everyday Tee! I LOVE this shirt!!

The Husker football heart was a file that I had purchased a while back, but I cannot remember for the life of me where from. 'Talk Herbie to Me' was made in Cricut Design Space. The fabric for the shirt is a rayon spandex from Joann's. All of the red heat transfer vinyl (HTV) used is Siser Easyweed from Amazon.

I now want to make all things Huskers for everyone in my family. Hoodies for my kiddos for Christmas are already in the works! I will certainly share those when I finish them!

*Be sure to check out the link to my shop at the top of this page! A few custom listings are open!*


Thursday, October 12, 2017

Daniella Skirt!

My next challenge after the Arabella was making a skirt for Little Miss Madelynn. The Arabella comes in girl's sizes, but I wanted something a little fuller for this adorable ballerina print. Rebecca Page to the rescue again! This time I used the Daniella pattern (previously called the Easy Peasy Skirt).

The previous name was very fitting. It truly was easy peasy. A basic gathered skirt pattern. Fairly quick, and great for beginners.

I made her the size 2 even though she measured in the 9 month waist size, but was at the top height for size 2. It is a bit big on her (thank goodness for cloth diapers to hold it up!), but I am still holding out hope that she may eventually hit a growth spurt. I opted to finish hers with a contrasting black rolled hem. So much love for the rolled hem!


Seriously, can she BE any more adorable?! (Friends anyone??)


One more picture for good measure (aka cuteness factor)! 

Monday, October 2, 2017

Everyday Tee

Ellie and Mac just released the Everyday Tee pattern. I made two of them during testing, and it quickly became a pattern that I will grab over and over again. 


It is a dolman sleeved, loose fitting, tee with a high/low curved hem. What's not to like?! 

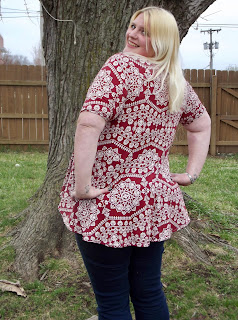
The back is two pieces making a vertical seam straight down the middle. It is a lovely added touch, but I will admit, I was not too sure why it was necessary before I tried it on. It adds a slimming effect by drawing the eye down. Can't be upset with anything slimming, right? 

I am really wishing that I had gotten a picture of the back of one of my shirts for you to see, but when I am the one in front of the camera I forget all the angles I should get.


I just ordered fabric to make another one of these Everyday Tees to add heat transfer vinyl to so I have a new Husker's shirt for the football game that Bobby and I are going to in November.

I picked this top for my upcoming football shirt since it is perfect for layering with a long sleeve top under, and/or a cardigan over top. Definitely a 3 season top here in Nebraska!

I promise I will share pictures when I have that top finished!!

Grab your copy of this pattern from Ellie and Mac ASAP!


P.S. Make sure you check out the link at the top of the homepage to my new Etsy shop!

Friday, August 18, 2017

Back to School Time!!

This week Lena and Parker started school! Second and 6th grade! They are growing to fast. This mama can't handle it!

Lena changed her mind, as always, and decided to wear a pretty dress that she got from her cousin for the first day of school instead of her awesome mama made (by request!) camo skirt. Parker opted to wear his "epic" batman board shorts that I made earlier in the summer, and a store bough t-shirt. 

Because of the lack of mama made back to school outfits I wanted to still make something for them for school, but what? They already had backpacks all ready to go, so that was out. I am still to scared to mess with the insulating fabric for lunch boxes, so thats out. Shoes? Nope. Well now I'm out of ideas since they don't need jackets.....

In comes Rebecca Page to save my day...again....


She just released a drawstring backpack and pencil case pattern! Woohoo!! 

Now, I know I said they didn't NEED backpacks, but what if I made them for a purpose other than school supplies and books? The backpack pattern looked too tempting to not make it, not gonna lie.

My justification: In winter they can bring their tennis shoes in it since they go to and from school in their snow boots. Yes!!


Well, it has been established that Parker LOVES Batman, so of course I had to go with that theme. I used quilting cotton for both the bag and pencil case, but I added heat transfer vinyl that I cut on my cricut machine for the actual Batman designs.


I went with the medium sized backpacks size they would be used for shoes, and possibly extra gloves and hats. There is a pocket on both the inside and the outside of the bag that would be perfect for those. 

The pencil cases have slots for 5 pencils, a large zipper pouch, and a pocket under the pencil holder. You can load those suckers up!


Lena is in love with all things galaxy at this particular moment, and this glittery galaxy fabric from Joann Fabrics jumped at me screaming her name. 

Since I made all of these from quilting cotton I had to add some interfacing to make them a bit more study. I used medium weight for the backpacks, and lightweight for the pencil cases. My iron got a workout!


Both patterns went together very smoothly, and I can lie, I was a little intimidated by how many pieces were involved. 

My biggest struggle was making buttonholes for the drawstring, but that was only because I had never done it before. I read my sewing machine manual, and tried twice on a scrap piece of fabric with my automatic buttonholer foot, and it was so easy! I can't believe I was so scared of buttonholes before!

I am so glad that I was able to find something to make the kids to bring to school, even if it wasn't clothes!

You can grab the patterns here. I truly recommend checking them out. Who doesn't need a pencil case?!

Friday, August 11, 2017

Arabella Skirt!!

My girls live in dresses and skirts year round, so I am always looking for a new style to make them. Lena likes a skirt with some volume, poofy, as she would say. That is why the Arabella from Rebecca Page screamed Lena to me!

 I am also kind of a sucker for patterns that come in the girl's sizes as well as mine, because I have a tendency to be that mom who makes matchy outfits for everyone. Bonus points for a quick sew, and ability to use fabric that I can find at Joann's so I don't have to wait for fabric mail. Arabella fits all of those criteria!


Lena picked this medium weight 100% cotton camo print for hers. Girl loves all things camo.... She measured in the high range for the women's size small, so I made her the medium. That way she will wear it a while. She wanted knee length, but since the pattern is drafted for the average height of 5'6" it is a touch long since I didn't shorten it, again because I wanted it to last her a while. We opted to finish with a rolled hem, and for no sash, because that might make her camo skirt "too girly." *rolls eyes*

It came together relatively quickly and easily. The worst/most time consuming part was gathering the skirt. Does anyone enjoy gathering really?

Once finished she had to put it to the twirl test, and it passed with flying colors. She decided she wants to wear it for the first day of school next week! WIN!!!


You can check out the full range of options for the Arabella here.

Friday, May 19, 2017

Fairytale Frock

Stitch Upon A Time just released a new dress pattern, the Fairytale Frock!

Just like all of her patterns, this dress is beginner friendly, and a relatively quick sew. 


It comes in sizes XXS-4X. Sleeveless or tulip sleeves, color blocked or not, and even or uneven front hem options. Oh, and the best option? POCKETS!!!


Blame it on a lack of confidence, or body image issues, but I thought that I would for sure look like I was wearing a tent in a swing style dress. I am so glad that I tried though, because I love the look and fit!

I am really looking forward to making more of these dresses. I think that I need a few solid color ones, and at least 23,408 more tie dye ones.

The loose and flowy style is perfect for out super hot Nebraska summers, especially in a cool fabric like rayon/spandex. This particular dress is in a double brushed poly, but it is still nice and cool.

I want to try one in an ITY knit as well, and see how well this pattern can be dressed up!


Go grab your copy of the Fairytale Frock here.

Grading Sizes and Adding Length

Grading Sizes:

All bodies are different and one of the best things about sewing clothes is that you can adjust things specifically how you want them. I know that for myself in more fitted tops and dresses I measure in a few different sizes. 

The easiest way to grade between sizes is if the PDF pattern uses layers in adobe. It can still be done if layers aren't used, but you just have to pay close attention to your size lines.

If your pattern uses layers, select and print the sizes that you need to grade between based on your body measurements compared to the measurement chart on the pattern.

For me I need 2 sizes, so that makes it a bit easier.


Next, all you have to do is draw a line to connect the sizes! Try and stay with the curve of the pattern as best you can.

When you cut your pattern out, be sure to follow your new line.

Lengthening a Pattern:

The majority of  patterns are made for the average height of 5'6". For someone tall like myself, the average length is just not enough. Thankfully something can be done about that!

Adding length is a little intimidating, but it is very easy. I promise.

Some patterns will have a lengthen/shorten line that will show you exactly where to cut it. For ones that don't have that you have to figure out where to add the length yourself.

You can choose to find the straightest part of the pattern and mark your line there, or if you know where you need the length the most you can add it there. Some designers will also say to just cut it in the middle.

I need the extra length in the top portion of shirts, so I look for the straightest part of the top to add my length. For this pattern that is about 1 inch from the arm.

Draw a line through the entire pattern to mark where you are going to cut.


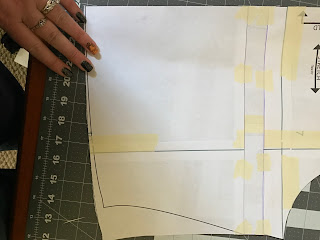
Now you need to tape a few pieces of paper together so you can essentially make an add on pattern piece.


I start by drawing a line across my paper about 1/2" from the edge or so.


Then you will measure from the first line how much you need to add, and draw another line. For this I am adding one inch.

Measure and draw another line 1/2" from the line you just drew.

You will have 3 lines. Cut along the third line.


If your pattern has a front and a back piece, as most do, you will have to add to both pattern pieces.


Now is the scary part....

Cut your original pattern piece along the line that you drew across it.

Now you will have 2 pieces.


Tape your top pattern piece to your long piece that you drew your lines on, matching the edge to the line that is 1/2" from the edge.


Tape the bottom piece to your other line.

I do this on my cutting mat so that I can ensure that the edge is lined up along the same line.

If your piece is one that has a cut on fold edge, you can go ahead and cut off your excess on the fold side.


On the other side of the pattern you will need to draw a line connecting the top and bottom pieces of your original pattern.


Cut off the excess from your lengthening piece, and voila! You're done!


Wednesday, April 5, 2017

Mary Peplum

Stitch Upon A Time Just released the Mary Peplum pattern, and it is fabulous! The pattern comes with sizes XXS-4X, 5 sleeve options, 4 peplum options, and 2 neckline finishes. My favorite is the half sleeve with the high/low peplum, and a banded neckline. 
  

I had never worn, nor made, a peplum top before, so I was not sure if I was going to like it or not. Then I put it on and fell in love. The style is extremely flattering! Especially if you like to hide a squishy belly and big butt!


The peplum begins just above the natural waist, adding a lovely flare right where you want it. Several mamas have said they love this top for baby wearing, because it covers up where the carrier straps like to make lumps appear.

I used a double brushed poly from So Sew English Fabrics for this top. OMG so soft! It also drapes the perfect amount for this top, without appearing clingy. This print had been calling to me for a long time, but I couldn't figure out what to make with it. Now I want it in all colors to make a Mary Peplum in each! I love love LOVE it!

I had to mash a few sizes in order to get my perfect fit, and this was the first time I ever did that! Life. Changing. No more, "it fits great except... " Nope! Not for me! A little extra work with the pattern before cutting is so worth it. A few pictures to take and I will be getting a post up about how you can do it too. Seriously worth it!

Make sure you stop by and grab your copy of the Mary Peplum! It is on sale, 35% off, until 4/10!!

Saturday, April 1, 2017

Sewing into the News...

A couple weeks ago I got a phone call from a local news anchor asking if I would be interested in him doing a small story about my busy life and my sewing. CRAZY!!!

Of course I accepted, and the next day I welcomed John Knicely and his camera into our home. It was a normal chaotic day in in our house. The babies were running around playing and spreading toys all over the living room. The big kids were playing outside in the yard while coming into the kitchen every couple minutes to see if the cookies I had just made were cool enough to eat. I was working on my pile of shirts that needed hemmed in between cookies going in and out of the oven. Our busy life!

He was here for an hour while asking us some questions and recording me doing my thing. Quick and painless!

A few days later we were on TV! How crazy is that?!

You can read the article and see the video here if you missed it!

Monday, March 13, 2017

PH2

Duck Butt Designs recently revamped their PhT shirt pattern, and it is perfect! 


With 2 girls and 2 boys I am a sucker for unisex patterns. Not only do I only have to buy one pattern, but making more than one of the same pattern keeps my assembly line going!


This pattern features a color blocked side/armsyce, long and short sleeve options, as well as optional oval or heart elbow patches. I paired Madelynn's with a Treasure Pocket Skirt, which is also from DBD. Max is wearing Maxaloones in the pictures, but I made him some Treasure Pocket Shorts to match when the weather is warmer.


Grab the pattern here, and make a bunch of your own!

Tuesday, February 28, 2017

Curvy Asta Dress!

When the tester call went out for the curvy version of the Asta Dress from Wardrobe by Me I jumped on the chance to do it. I had seen so many women make these gorgeous dresses, and I knew exactly how I would make one if it came in my size. My prayers were answered! The Curvy Asta is here!


This classic dress comes with options for boatneck, or 2 different heights of turtleneck. There are short, elbow, 3/4, and long sleeve options, as well as sleeveless. So many possibilities! Oh, and did I mention it has pockets??!! How can you not love a dress that has pockets?! 


My vision for this dress HAD to have lace sleeves. I chose elbow length sleeves, because I felt like it was a perfect length to showcase the lace.

The fabric I chose was a refined pointe that I found at Joann's and had been hoarding. I was a little afraid that it was going to look a bit like a funeral dress in all black, but I had to try!

One great detail of this dress is the fact that the skirt is in 4 pieces. The seam down the middle has a slimming effect. Anything slimming is welcome in a curvy pattern! Because of this 4 piece skirt, and the resulting top stitching, I decided to do use hot pink for all of my topstitching. Just a touch of color never hurt anyone!


I am beyond thrilled with this dress. It's gorgeous! I think that it turned out better than I was envisioning. I plan to wear this to Lena's pageant in a couple weeks, and I can't wait! I see a sleeveless version in my near future as well.

Grab your copy of the Curvy Asta here. You won't regret it!