Grading Sizes:
All bodies are different and one of the best things about sewing clothes is that you can adjust things specifically how you want them. I know that for myself in more fitted tops and dresses I measure in a few different sizes.
The easiest way to grade between sizes is if the PDF pattern uses layers in adobe. It can still be done if layers aren't used, but you just have to pay close attention to your size lines.
If your pattern uses layers, select and print the sizes that you need to grade between based on your body measurements compared to the measurement chart on the pattern.
For me I need 2 sizes, so that makes it a bit easier.
Next, all you have to do is draw a line to connect the sizes! Try and stay with the curve of the pattern as best you can.
When you cut your pattern out, be sure to follow your new line.
Lengthening a Pattern:
The majority of patterns are made for the average height of 5'6". For someone tall like myself, the average length is just not enough. Thankfully something can be done about that!
Adding length is a little intimidating, but it is very easy. I promise.
Some patterns will have a lengthen/shorten line that will show you exactly where to cut it. For ones that don't have that you have to figure out where to add the length yourself.
You can choose to find the straightest part of the pattern and mark your line there, or if you know where you need the length the most you can add it there. Some designers will also say to just cut it in the middle.
I need the extra length in the top portion of shirts, so I look for the straightest part of the top to add my length. For this pattern that is about 1 inch from the arm.
Draw a line through the entire pattern to mark where you are going to cut.
Now you need to tape a few pieces of paper together so you can essentially make an add on pattern piece.
I start by drawing a line across my paper about 1/2" from the edge or so.
Then you will measure from the first line how much you need to add, and draw another line. For this I am adding one inch.
Measure and draw another line 1/2" from the line you just drew.
You will have 3 lines. Cut along the third line.
If your pattern has a front and a back piece, as most do, you will have to add to both pattern pieces.
Now is the scary part....
Cut your original pattern piece along the line that you drew across it.
Now you will have 2 pieces.
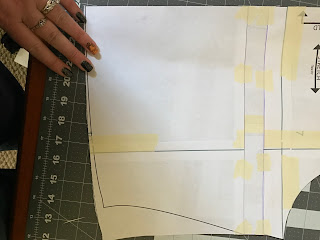
Tape your top pattern piece to your long piece that you drew your lines on, matching the edge to the line that is 1/2" from the edge.
Tape the bottom piece to your other line.
I do this on my cutting mat so that I can ensure that the edge is lined up along the same line.
If your piece is one that has a cut on fold edge, you can go ahead and cut off your excess on the fold side.
On the other side of the pattern you will need to draw a line connecting the top and bottom pieces of your original pattern.
Cut off the excess from your lengthening piece, and voila! You're done!


