Just before Halloween my poor Bubba fell off of the monkey bars at school and broke his arm right above his elbow. He had to have surgery to reset it and put pins in to hold it in place. Only having one good arm when you are 6 makes it hard to do things!
He needed pull on pants, because he could not do the button and zipper on his jeans. So I made him some! I made several pairs of
Jack's Joggers from Stitch Upon a Time to start out with since they are so fast and easy. He also needed a way to stay warm without having to try and work the sleeves over his broken arm and removing the sling. Riding Hood from
SUAT to the rescue!
I wanted to try something a little different for another pair of pants. I added length to the
Kid's Copenhagen Board Shorts to make some awesome BB8 pants! This pattern is meant for woven fabrics, so my next pair I am going to try with denim for some pull on jeans.
So cute right!?
Well, the biggest obstacle was the darn sling he had to have. He didn't want to wear it because it was embarrassing.
Mama and her sewing machine to the rescue!
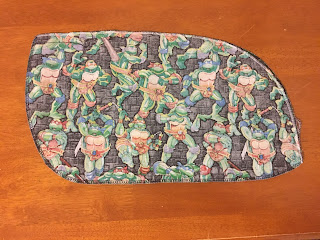
In case you find yourself in the same kind of predicament, here's how I made the sling cover:
What you need:
Pen and paper
Fabric marking tool of choice
Sling
7 sets of snaps and snap pliers (I used KAM snaps)
1/4-1/2 yard of fabric (knit or woven) depending on size.
Thread
Sewing machine (though it would be just as easy to hand sew!)
First, make a pattern by laying the sling on top of 2 papers taped together and trace around the edges.
Then I draw a line around the first line by roughly 1/2" to give you a seam allowance, and cut the pattern out along that line.
I drew squiggly lines on my pattern showing my where the sling was sewn together to ensure I sewed up the correct sides, and directions to cut 2 mirrored images in case I forgot.
Next, make dots where you want to add snaps to the sling cover, and mark it on the sling itself as well.
Cut 2 mirror images of your fabric.
If you are using a woven fabric, serge or zigzag stitch around the edges of both pieces to keep it from fraying.
Sew or serge along the curve you marked on your pattern with right sides facing.
I finished the seam by pressing it to the side and top stitching 1/8" from the seam.
Fold and pin the raw edges down 1/2" (or whatever you made your seam allowance), and top stitch it down.
I used decorative stitching for this step, but a regular straight stitch works just fine!
Transfer the snap markings from your pattern onto the cover, and attach the snaps.
I put the studs on the cover, and the sockets onto the sling.
Ta Da! Done!
You could just as easily make a cover and sew it directly to the sling itself by following the same steps. Pin the cover onto the sling and sew along the edges and the bottom seam.
If you make one of these I want to hear how it went!


